News
Coca Cola fixes my stud finder November 05 2014, 25 Comments
So, this isn't exactly the usual Periwinkle post, but I'm super excited and just needed to share. Most of the store is pegboard and hanging up things is a cinch. We can put things up most anywhere (as long as it conforms to the 1 inch grid!). In that little box closet up front, though, there is not pegboard on the walls, though. I went to hang a shelf bracket and realized it would be rather important to hit a stud -- or I might be replastering a wall rather soon!
I keep my tool boxes all together, easy to find. I'm often going through them, too, but while some things (hammer and Phillips screwdriver) I use most all the time, other things, not so much. Sadly, the stud finder is one of those things that I don't use too often. (Pegboard, remember?) So, I was rather gleeful when digging down to the bottom of the tool bag with my power saw and it's battery pack, I found that stud finder. The glee was short lived however. I don't know how long ago I last used it, I really can't remember using it in this storefront. It wouldn't turn on and I quickly realized it was because the batteries were corroded.

Ack! So sad, right? I packaged up the batteries for the next hazardous waste disposal and turned my attentions to the stud finder. It looked okay ish, but even with new batteries, it just didn't work.

Which is when I turned to the computer. After a little bit of searching, I found that Coca Cola is not just a yummy drink, it also eats right through corrosion. Just love a good multi purpose product! So I set up.

I poured just a little soda into the cup and drank the rest. I didn't need much to work with and activities like this are most always better with refreshments.

Just painted it on! Sort of daintily to be honest, I was afraid everything would get sticky! And then, guess what --

… it works? Woohoo! Now, I just need to hang the shelf bracket.
Looking for a Last Minute Halloween Decoration? October 29 2014, 8 Comments
Paper pom poms are fast and easy to make! All you need is are a few sheets of orange tissue paper and some green ribbon and you can make our cheery decorations.

You'll need 4 sheets of orange tissue paper. Stack them up and lay them out flat.

Cut through the entire stack, in half the short way, like this:

Put both stacks together. Now it's time to fold! You'll be making accordion style pleats, folding back and forth every inch. It doesn't have to be precise, but the folds should be roughly the same size.

When it is all folded, use scissors to round the edges on both ends. Careful! The paper will be a bit thick.

Now, tie the center, tight. I like to use twine, because it makes a tidy knot.

Now start fluffing up the tissue. You can pull surprisingly hard on the sheets and give it a good crumpling.

Use the twine to tie on a little piece of ribbon to be the stem and leaves. Then just fluff a bit more. Done!
How to Tie a Scarf Like Our Display Scarves September 10 2014, 60 Comments
It's still a wee bit warm here, but very soon the weather will be crisp and cool and we're all going to be looking to bundle up! It's hard to imagine right now, but, soon enough. The perfect item to add a little warmth and style all at once? A scarf! Periwinkle carries a wide selection from gauzy and dreamy to fuzzy and knit, there is sure to be something perfect for every outfit.
Many of our scarves displayed here on PeriwinkleEmporium.com and in store are tied in the same way. Our signature knot looks fancy and complicated but is so easy to tie!

Step 1: Start with a longish scarf and fold it directly in half. Drape around your neck so the fold is on one side and the loose ends on the other:


Step 2: Choose one of the two ends and pull it through the loop of the fold. Take hold of fold and pull it away from the end that was brought through:


Step 3: Give this loop a twist. A full twist should separate the fold from the end that had been brought through. Take the other end and pull this through the new loop:


Step 5: Just a little styling, fan the lower end out and give the higher end a little tug towards center before fanning it out as well. You're done! So easy -- if you are careful, this will slip over your head to take it off and can be slipped back on again!

How to Wrap Ribbon Around a Box Neatly September 06 2014, 2 Comments
We wrap a lot of boxes here at Periwinkle. Over 3,000 for Christmas alone! With all that practice, a rather distinct wrapping style has emerged. We need tidy and efficient! Our finished boxes have smoothly ribboned bottoms that sit flat and present the ribbon well. As an added bonus, keeping ribbon on the bolt until nearly finished eliminates the frustration of cutting not quite enough and the waste of cutting too much!
Our finished box bottoms look like this:

Step 1: Don't cut anything yet! Start by unrolling enough ribbon to circle the box and tie half a bow, about a foot is good. If you will be making a fancy pom pom to tie on, leave only enough for a knot, about 6 inches will suffice. Lay the ribbon out across the top of the box with your bow or knot portion below the half way point, like this:

Step 2: Circle the ribbon around the box making sure it is smooth and untwisted. One side is still connected to the bolt. Make a twist here and send the side connected to the bolt off to the left.

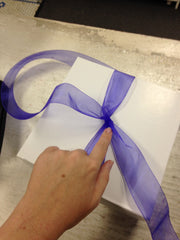
Step 3: Circle the ribbon around the box making sure it is smooth and untwisted. When you bring it back to the original twist, determine how much ribbon you will need -- a bow is about a foot, a knot 6 inches. Now you cut from the bolt. Tuck the newly cut piece under the original twist (it will travel towards the boxes upper left corner and then back under the twist towards the boxes lower right corner.) Pull on the tucked end and the starting end and something like a knot forms. This will hold until you tie a bow or can tie down a pom pom!


Yay! You have a neatly ribboned box that sits completely flat! No wasteful scraps of ribbon and no flipping the box this way and that or over!
