How to Wrap Ribbon Around a Box Neatly September 06 2014, 2 Comments
We wrap a lot of boxes here at Periwinkle. Over 3,000 for Christmas alone! With all that practice, a rather distinct wrapping style has emerged. We need tidy and efficient! Our finished boxes have smoothly ribboned bottoms that sit flat and present the ribbon well. As an added bonus, keeping ribbon on the bolt until nearly finished eliminates the frustration of cutting not quite enough and the waste of cutting too much!
Our finished box bottoms look like this:

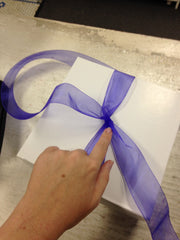
Step 1: Don't cut anything yet! Start by unrolling enough ribbon to circle the box and tie half a bow, about a foot is good. If you will be making a fancy pom pom to tie on, leave only enough for a knot, about 6 inches will suffice. Lay the ribbon out across the top of the box with your bow or knot portion below the half way point, like this:

Step 2: Circle the ribbon around the box making sure it is smooth and untwisted. One side is still connected to the bolt. Make a twist here and send the side connected to the bolt off to the left.

Step 3: Circle the ribbon around the box making sure it is smooth and untwisted. When you bring it back to the original twist, determine how much ribbon you will need -- a bow is about a foot, a knot 6 inches. Now you cut from the bolt. Tuck the newly cut piece under the original twist (it will travel towards the boxes upper left corner and then back under the twist towards the boxes lower right corner.) Pull on the tucked end and the starting end and something like a knot forms. This will hold until you tie a bow or can tie down a pom pom!


Yay! You have a neatly ribboned box that sits completely flat! No wasteful scraps of ribbon and no flipping the box this way and that or over!

Comments
hxhshboaou on March 27 2021 at 12:13PM
Muchas gracias. ?Como puedo iniciar sesion?
Rucel on April 09 2015 at 06:57AM
I get the biggest, most snitemental smile when I see your goodies! I bought your Christmas light reflectors last year and my sister and I cried when we lit up the tree such great memories! Sure would love to win this fun package of goodies! Keep up the great searches for all the ol fashioned goodness! Hugs & XX